Cozy Strawberry Earthquake Cake is the ultimate solution for those days when you need a hug in dessert form but your schedule looks like a game of Tetris gone wrong. We have all been there, staring at a half-empty pantry while the kids ask for a snack for the third time in an hour, or trying to find a dish that looks fancy enough for the potluck without actually spending four hours in the kitchen. This Cozy Strawberry Earthquake Cake combines the bright, sunny flavor of fresh berries with a rich, decadent cream cheese swirl that creates those signature “cracks” and “fault lines” across the top as it bakes. Because it intentionally looks messy and rustic, you don’t have to worry about perfect frosting or smooth edges, making it a stress-free win for busy moms and professionals alike. Since the cake relies on simple, wholesome ingredients you likely already have, you can whip it up whenever the craving for something sweet and comforting strikes. Whether you are serving it warm on a rainy Sunday afternoon or packing a slice in a lunchbox, this dessert brings a bit of magic to the table without the typical baking burnout.
What is Cozy Strawberry Earthquake Cake?
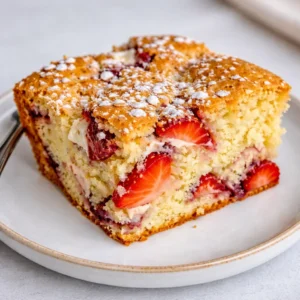
If you haven’t encountered an earthquake cake before, you are in for a treat that defies traditional baking logic. A Cozy Strawberry Earthquake Cake is a delightful “dump and swirl” style dessert where the batter and a cream cheese filling are layered together in a single pan. As the cake bakes in the oven, the heavy cream cheese mixture sinks into the lighter strawberry batter, while the cake rises around it. This movement causes the surface to crack and shift, creating a cratered, mountainous landscape that looks like a delicious seismic event occurred in your oven. Unlike a standard layer cake that requires precise leveling and tedious decorating, this cake celebrates its imperfections. The result is a moist, dense crumb packed with pockets of molten cheesecake and bursts of fresh strawberry juice. It is essentially a hybrid between a classic fruit sponge and a rich cheesecake, providing the best of both worlds in every single bite.
Reasons to Try Cozy Strawberry Earthquake Cake
You should definitely give this Cozy Strawberry Earthquake Cake a try if you value flavor over fussiness. First and foremost, the texture is absolutely incredible because you get that contrast between the fluffy strawberry cake and the creamy, tangy cheesecake pockets. It is also a fantastic way to use up seasonal strawberries that might be getting a little too soft for snacking but are perfect for macerating and baking. For those of us who struggle with “baker’s anxiety,” this recipe is a total lifesaver because it is virtually impossible to mess up the appearance—the more “messed up” it looks, the better it actually is. Furthermore, it is a massive crowd-pleaser that appeals to both kids who love the bright berry flavor and adults who appreciate the sophisticated cream cheese element. It is also surprisingly sturdy, meaning it travels well to office parties or neighborly get-togethers without falling apart in the car. Finally, it fills your entire house with the most intoxicating aroma of vanilla and roasted strawberries, which is honestly a form of therapy in itself.
Ingredients Needed to Make Cozy Strawberry Earthquake Cake
- 2 cups all-purpose flour (240 grams): The sturdy base that holds our strawberry “earthquakes” together.
- 2 teaspoons baking powder: To give our cake that essential lift and fluffiness.
- 1 ½ cups granulated sugar (300 grams): For the cake batter, providing just the right amount of sweetness.
- ½ teaspoon salt: A tiny pinch to balance the sugars and make the flavors pop.
- ½ cup unsalted butter (115 grams), softened: Use real butter for that rich, homemade taste we all crave.
- 2 large eggs, room temperature: They mix much better when they aren’t cold from the fridge.
- ¾ cup whole milk (180 ml): Adds moisture and a tender crumb to the finished cake.
- 1 teaspoon vanilla extract: Because every good cake deserves a floral, aromatic boost.
- 1 ½ cups fresh strawberries (225 grams), hulled and chopped: The star of the show, providing natural tartness.
- 2 tablespoons granulated sugar: Specifically for macerating the berries to draw out those lovely juices.
- 1 teaspoon cornstarch: This prevents the strawberries from turning your cake into a soggy mess.
- 8 ounces cream cheese (225 grams), softened: The core of the “earthquake” swirl.
- ½ cup powdered sugar (60 grams): For sweetening the cream cheese without adding grittiness.
- 1 large egg, room temperature: To bind the cream cheese mixture so it sets properly.
- ½ teaspoon vanilla extract: For that extra layer of flavor in the cheesecake portion.
Instructions to Make Cozy Strawberry Earthquake Cake – Step by Step
Step 1 Start your Step by Step journey by prepping those beautiful berries. In a medium-sized bowl, toss your chopped strawberries with two tablespoons of sugar and a teaspoon of cornstarch. You want to let these sit for about 15 minutes to macerate, which is just a fancy way of saying “letting them get all juicy and delicious.” This Step by Step process is vital because the cornstarch will thicken those juices, ensuring the cake stays moist but not waterlogged.
Step 2 While the berries are doing their thing, go ahead and preheat your oven to 350°F (175°C). Taking the time for this Step by Step ensures your cake hits the heat immediately for a perfect rise. Grab a large bowl and whisk together your flour, baking powder, and salt until they are well combined. In a separate, larger bowl, beat your softened butter and granulated sugar together for about 3 minutes. You are looking for a light and fluffy texture that looks like pale clouds.
Step 3 Next in our Step by Step guide, it is time to marry the ingredients. Add your eggs to the butter mixture one at a time, beating well after each addition to keep the emulsion stable. Pour in your milk and vanilla extract, then gradually fold in the dry flour mixture. Stir until just combined; overmixing is the enemy of a tender cake. Once the batter is smooth, gently fold in those macerated strawberries along with every drop of their ruby-red juice.
Step 4 Now we focus on the “earthquake” element in this Step by Step process. In a clean bowl, beat your softened cream cheese with the powdered sugar, one egg, and a splash of vanilla. You want this to be silky smooth, which usually takes about 2 to 3 minutes of vigorous mixing. This mixture is what creates the decadent, creamy pockets that make this cake so special.
Step 5 Assemble the masterpiece by grease-lining a 9×13 inch baking pan. Pour about half of your strawberry batter into the bottom, spreading it out to the edges. Dollop half of your cream cheese mixture over the batter in big spoonfuls. Use a knife or a skewer to swirl them together gently. Pour the remaining batter on top, add the rest of the cream cheese, and give it one last gentle swirl. This Step by Step layering is what creates the beautiful marbled effect.
Step 6 Pop the pan into the oven and bake for 45 to 50 minutes. During this Step by Step baking phase, keep an eye on the color; if the cream cheese starts browning too quickly, simply tent the pan with a bit of aluminum foil. You’ll know it’s done when a toothpick inserted into the cake portion comes out with just a few moist crumbs.
Step 7 The hardest Step by Step instruction is the waiting. Let the cake cool in the pan on a wire rack for at least 30 minutes. If you try to slice it too soon, the cream cheese will be too gooey and might ooze out. Giving it time to set ensures every slice is a perfect, shaky-yet-stable piece of earthquake heaven.
What to Serve with Cozy Strawberry Earthquake Cake
While this Cozy Strawberry Earthquake Cake is a powerhouse all on its own, you can definitely level it up with a few simple additions. A dollop of homemade whipped cream or a scoop of premium vanilla bean ice cream is a classic choice, as the cold creaminess melts into the warm “fault lines” of the cake. If you want to lean into the “cozy” vibes, serve a thick slice alongside a steaming cup of Earl Grey tea or a latte. For a brunch setting, a side of fresh mimosas or a crisp sparkling cider balances the richness of the cream cheese beautifully. If you’re feeling a bit extra, a drizzle of balsamic glaze or a few sprigs of fresh mint can add a gourmet touch that makes this simple sheet cake look like it came from a high-end bakery.
Key Tips for Making Cozy Strawberry Earthquake Cake
The biggest secret to a successful Cozy Strawberry Earthquake Cake is the temperature of your ingredients. Always make sure your cream cheese, butter, and eggs are at room temperature before you start; this prevents lumps and ensures the batter incorporates smoothly. When swirling the cream cheese, remember that less is often more. If you over-swirl, the two mixtures will just blend into a pinkish blob instead of having those distinct, beautiful pockets of cheesecake. Also, don’t be afraid to use frozen strawberries if fresh ones aren’t in season; just make sure to thaw them and pat them dry slightly before macerating so they don’t add too much excess liquid to the pan. Finally, always check your baking powder for freshness, as a good rise is what creates the “earthquake” pressure needed to crack the surface.
Storage and Reheating Tips Cozy Strawberry Earthquake Cake
Because this Cozy Strawberry Earthquake Cake contains a significant amount of cream cheese and fresh fruit, you can’t just leave it out on the counter for days. Once the cake has cooled completely, cover it tightly with plastic wrap or transfer slices to an airtight container and store them in the refrigerator. It will stay fresh and delicious for up to 4 to 5 days. If you want to enjoy that “just out of the oven” experience, you can reheat individual slices in the microwave for about 15 to 20 seconds. This softens the cream cheese and makes the cake crumb incredibly tender again. You can also freeze this cake for up to 3 months; just wrap individual slices in parchment paper and foil to prevent freezer burn, then thaw in the fridge overnight before eating.
FAQs
Can I use a different fruit instead of strawberries? Absolutely! This “earthquake” method works wonderfully with blueberries, raspberries, or even chopped peaches. Just follow the same macerating steps to ensure the fruit behaves well during the bake.
Why did my cake sink in the middle? A little bit of sinking is normal for an earthquake cake—that’s part of the charm! However, if it collapses entirely, you might have opened the oven door too early, or your baking powder might be expired.
Can I make this in a different sized pan? You can use a 9-inch bundt pan, but you will need to increase the baking time by about 10 to 15 minutes. Just keep a close eye on it and use the toothpick test to be sure.
Do I have to use full-fat cream cheese? While you can use low-fat, full-fat cream cheese provides a much richer flavor and a more stable texture for the swirl. For the most “cozy” experience, stick with the regular stuff.
Final Thoughts
At the end of a long day, there is something deeply satisfying about a dessert that doesn’t demand perfection. This Cozy Strawberry Earthquake Cake is a testament to the idea that some of the best things in life are a little messy, a little unpredictable, and completely comforting. It is a recipe that grows with you, whether you’re making it for a toddler’s birthday or a quiet evening in with your partner. The combination of sweet fruit, tangy cheese, and soft cake is a timeless trio that never fails to hit the spot. So, grab your mixing bowls, don’t worry about the crumbs, and lean into the delicious chaos of a cake that is meant to be shaken up. After all, life is too short for boring, flat desserts when you could be having an earthquake instead.
Print
- Prep Time: 20 minutes
- Cook Time: 45-50 minutes
- Total Time: 1 hour 10 minutes
- Yield: 12 servings 1x
- Category: Dessert
- Method: Baking
- Cuisine: American
- Diet: Vegetarian
Description
A moist and flavorful strawberry cake with a creamy tangy cream cheese swirl that creates a unique ‘earthquake’ effect in the crumb. Perfect for cozy gatherings or a comforting homemade treat.
Ingredients
- 2 cups all-purpose flour (240 grams)
- 2 teaspoons baking powder
- 1 ½ cups granulated sugar (300 grams)
- ½ teaspoon salt
- ½ cup unsalted butter (115 grams), softened
- 2 large eggs, room temperature
- ¾ cup whole milk (180 ml)
- 1 teaspoon vanilla extract
- 1 ½ cups fresh strawberries (about 225 grams), hulled and chopped
- 2 tablespoons granulated sugar
- 1 teaspoon cornstarch
- 8 ounces cream cheese (225 grams), softened
- ½ cup powdered sugar (60 grams)
- 1 large egg, room temperature
- ½ teaspoon vanilla extract
Instructions
1. In a medium bowl, toss the chopped strawberries with 2 tablespoons sugar and 1 teaspoon cornstarch. Set aside for 15 minutes to macerate.
2. Preheat oven to 350°F (175°C). In a large bowl, whisk together flour, baking powder, and salt.
3. In a separate bowl, beat softened butter and sugar until light and fluffy (about 3 minutes). Add eggs one at a time, beating well after each. Mix in milk and vanilla extract.
4. Gradually add the flour mixture to the wet ingredients, mixing until just combined. Gently fold in the macerated strawberries with their juices.
5. Beat softened cream cheese with powdered sugar, egg, and vanilla extract until smooth (2-3 minutes).
6. Pour half the strawberry batter into a greased 9×13 inch pan. Dollop half the cream cheese mixture on top and swirl gently with a knife or skewer.
7. Pour remaining batter over and repeat with remaining cream cheese mixture, swirling again.
8. Bake for 45-50 minutes or until a toothpick inserted near the center comes out with moist crumbs. Tent with foil if needed.
9. Let cake cool in pan on a wire rack for at least 30 minutes before slicing.
Notes
Do not skip macerating the strawberries to prevent soggy cake.
Use room temperature ingredients for better texture.
Swirl cream cheese gently to maintain marbled effect.
Use fresh baking powder for good rise.
Start checking cake at 40 minutes to avoid overbaking.
Let cake cool before slicing to prevent cream cheese from oozing.
Nutrition
- Serving Size: 1 slice
- Calories: 320
- Sugar: 28g
- Sodium: 180mg
- Fat: 14g
- Saturated Fat: 8g
- Unsaturated Fat: 5g
- Trans Fat: 0g
- Carbohydrates: 42g
- Fiber: 1g
- Protein: 5g
- Cholesterol: 75mg